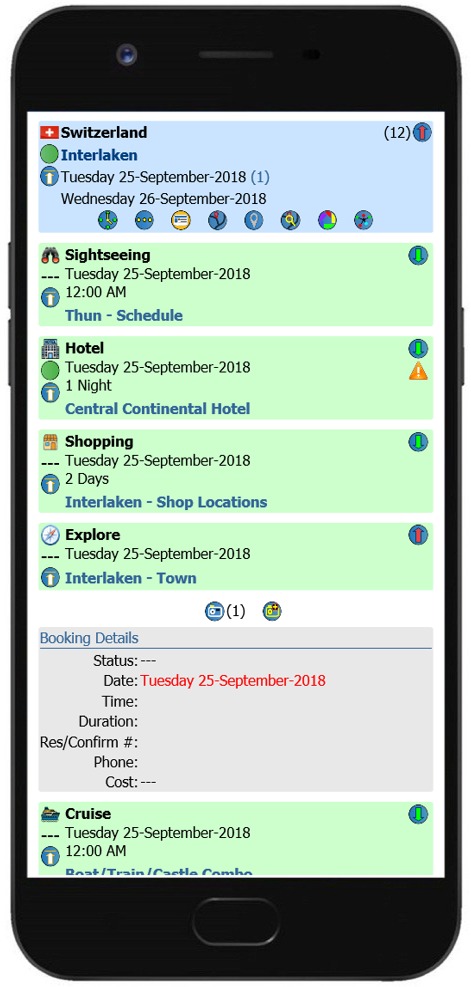
When an
activity has been expanded to display the
booking details, selecting the
 icon allows you to upload photos to
the related activity. (On the Trip Control page, the
option to display Photos must be enabled for the Mobile Trip Profile upload photo icon to display)
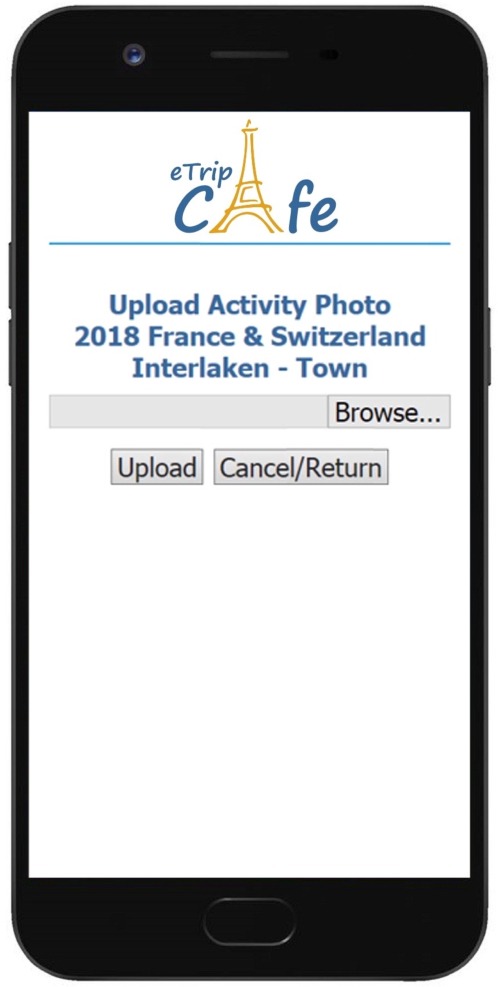
Selecting the icon will display the photo upload page where you can
select a photo from your gallery or use your mobile photo to take a new photo to be uploaded.
Once a photo has been uploaded to an
activity, you will redirected back to the related activity where the
photo will display. Mobile uploaded photos can be made available to Trip Tracking Members depending on the Trip Control settings.
icon allows you to upload photos to
the related activity. (On the Trip Control page, the
option to display Photos must be enabled for the Mobile Trip Profile upload photo icon to display)
Selecting the icon will display the photo upload page where you can
select a photo from your gallery or use your mobile photo to take a new photo to be uploaded.
Once a photo has been uploaded to an
activity, you will redirected back to the related activity where the
photo will display. Mobile uploaded photos can be made available to Trip Tracking Members depending on the Trip Control settings.
Photo Upload Steps
Select
'Browse...' just as you would when uploading
a photo to a website. Once a file is
selected, select 'Upload' to complete the
process or 'Cancel/Return' to return to the
activity. The photo selection process
may be slightly different depending on your
phone, but it should work something like
this. You should be give the option to
select a photo from your photo gallery on
your phone, or select the camera to take a new
photo to be uploaded.
When
photos are uploaded to trip activities using
your mobile device, they will be flagged as
a timeline photo. Select the
 icon at the trip level to display the
Activity Photo Timeline. Photos uploaded to activities
through the website are not included in the Timeline.
icon at the trip level to display the
Activity Photo Timeline. Photos uploaded to activities
through the website are not included in the Timeline.
 Mobile Activity Photo Upload is a Premium Service and must be purchased and applied to a trip before you are able to upload photos with the Mobile Trip Profile.
|
Expanded Location/Activity |
Activity Photo Upload |
|
Expanded activity for a location showing the Booking Details
and the photo upload
icon. |
Standard photo
upload screen where you may browse
to an existing photo or take a new
photo using your Smartphone to be uploaded to the
activity. |
 |
 |